Mastering Orange Crème Brûlée with a Zesty Ginger Twist: Your Guide to a Flawless French Dessert
Orange crème brûlée elevates the beloved classic French custard to an extraordinary new realm of flavor and sophistication. This dessert is a symphony of textures and tastes, featuring a luxuriously smooth, creamy custard base contrasted by its iconic crackly, caramelized sugar top. Our unique rendition infuses this timeless treat with the bright, vibrant essence of fresh orange zest and a delicate whisper of ginger, adding an unexpected warmth and aromatic complexity that will captivate your senses. If you’ve been searching for an innovative yet approachable take on crème brûlée, this recipe promises an irresistibly delicious and surprisingly easy-to-make experience. Prepare to impress your family and friends as we delve into creating this exquisite citrusy spin on a perennial favorite.
The beauty of crème brûlée lies in its simple ingredients transformed through careful technique into something truly magical. Originating in France, this elegant dessert has graced countless dinner tables and Michelin-starred restaurants for centuries. While vanilla is the traditional flavor, the versatility of crème brûlée allows for endless creative interpretations. Our orange and ginger fusion not only brightens the rich custard but also adds a layer of sophisticated spice that makes each bite a delightful adventure.

Embracing a balanced lifestyle doesn’t mean you have to forsake delightful desserts entirely. Crème brûlée, when enjoyed mindfully, can certainly be part of a healthy approach. The key is to savor it for special occasions and keep your portions thoughtfully small. By using bold, impactful flavors like orange and ginger, just a few bites of this mini crème brûlée will deliver intense satisfaction, making every spoonful count. Discovering how effortlessly this elegant dessert can be made right in your own kitchen opens up a world of possibilities for holidays, celebrations, and any moment you wish to “wow” your loved ones with a truly homemade culinary masterpiece.
Beyond its incredible taste, homemade crème brûlée offers the immense satisfaction of creating something beautiful from scratch. The process, while seemingly intricate, is quite straightforward once you understand the basic steps and a few fundamental techniques. This guide is designed to empower you to achieve a perfect, restaurant-quality orange ginger crème brûlée every single time, from the velvety custard to the perfectly torched sugar crust.
[feast_advanced_jump_to]
Why You’ll Love This Orange Crème Brûlée Recipe
- **A Delectable Twist on a Classic:** Move beyond traditional vanilla and experience a vibrant burst of citrus complemented by a warming hint of ginger. This unique flavor profile sets our orange crème brûlée apart, offering a refreshing yet comforting dessert experience that will surprise and delight your palate. It’s a sophisticated upgrade to a beloved staple.
- **Perfectly Portioned Indulgence:** Our recipe is designed for mini ramekins, providing a small yet incredibly satisfying individual serving. This thoughtful portion control allows you to indulge without overdoing it, making it ideal for entertaining or a personal treat. Each mini crème brûlée is a complete, elegant dessert on its own.
- **Easier Than You Think:** Don’t be intimidated by its gourmet reputation! By following our clear, step-by-step directions and expert tips, you’ll find that making homemade crème brûlée is surprisingly simple and immensely rewarding. We break down the process to ensure success even for novice bakers.
- **Impressive for Entertaining:** The stunning presentation of a golden, caramelized top makes crème brûlée an absolute showstopper. This orange ginger version adds an extra layer of intrigue, ensuring your guests will be thoroughly impressed by both the visual appeal and the exquisite taste. It’s perfect for dinner parties, holidays, or any special gathering.
- **Make-Ahead Convenience:** Most of the preparation can be done in advance, allowing you to focus on other aspects of your meal or celebration. Simply bake and chill the custards, then torch the tops right before serving for that dramatic, fresh caramel crunch. This flexibility makes it an ideal dessert for busy hosts.
If you adore the bright flavor of orange, you might also enjoy this easy orange almond cake, another simple and delicious citrus-infused treat.
Essential Ingredients for Your Orange Crème Brûlée
Creating an impeccable crème brûlée starts with understanding the role of each ingredient. Here’s a detailed look at what you’ll need and why:
- Heavy Whipping Cream: This is the cornerstone of a rich, velvety custard. Look for labels that explicitly state “heavy cream” or “heavy whipping cream,” as these contain a minimum of 36% butterfat. This high fat content is crucial for achieving that characteristic smooth, luxurious texture that defines crème brûlée. Regular whipping cream, with its slightly lower fat content (30-36%), won’t yield the same opulent result. Some premium dairies even offer heavy whipping cream with up to 40% butterfat for an extra-rich custard.
- Sugar: You’ll need two types of sugar for this recipe.
- **Granulated Sugar:** This is used to sweeten the custard base, providing the necessary balance to the rich cream and egg yolks.
- **Coarse Turbinado or Demerara Sugar:** This is essential for the signature “brulee” (burnt) top. These unrefined sugars have larger crystals and a molasses-like flavor, which helps them caramelize beautifully under high heat, forming that distinct, brittle, golden-brown crust. Do not substitute with fine granulated sugar for the topping, as it melts too quickly and can burn unevenly.
- Grated Orange Zest: The zest, not the juice, is where the intense citrus oils reside, providing a bright, aromatic burst of orange flavor. Be sure to use a fine grater or microplane to get just the orange part of the peel, avoiding the bitter white pith underneath. Freshly grated zest makes a significant difference compared to dried or pre-packaged alternatives.
- Ginger: This ingredient introduces a delightful warmth and subtle spice that perfectly complements the orange. You can use finely grated fresh ginger for the most vibrant flavor, or for convenience, a good quality jarred ginger puree. If using fresh, ensure it’s very finely grated so it can easily infuse the cream and be strained out without leaving fibrous bits.
- Eggs: Specifically, you only need the **egg yolks** for this custard. The yolks are rich in fat and proteins, which are responsible for setting the custard into its firm yet tender state. Save the egg whites for other recipes like meringues, macarons, angel food cake, or egg white frittatas – they freeze beautifully for later use.
- A Pinch of Salt: Often overlooked, a small amount of salt enhances all the other flavors, balancing the sweetness and richness of the custard.
Please refer to the detailed recipe card below for precise measurements and additional details to ensure your orange crème brûlée is perfect every time.
Chef’s Tip: Heavy Whipping Cream vs. Whipping Cream: Understanding the difference is crucial for a successful custard. Heavy whipping cream boasts a butterfat content of no less than 36%, making it exceptionally rich and ideal for a thick, stable custard. Whipping cream, on the other hand, has a slightly lower fat content, typically ranging from 30-36%. While both can be whipped, heavy cream provides a superior mouthfeel and structure for crème brûlée. Opt for the “heavy” variety for the best results.
Detailed Recipe Instructions: Crafting Your Orange Ginger Crème Brûlée
Making crème brûlée is a process of precise steps, but each one is manageable and rewarding. Follow these instructions carefully for a flawless dessert.
Step 1: Infuse the Cream with Flavor
Begin by combining the heavy cream, granulated sugar, and a pinch of salt in a small, heavy-bottomed saucepan. Heat the mixture over medium-low heat, whisking continuously until the sugar fully dissolves. Do not let it boil vigorously; aim for just below a simmer, with small bubbles forming around the edges. Once the sugar is dissolved and the cream is warm, remove the pan from the heat. Stir in the generous amount of fresh orange zest and the finely grated ginger. Cover the pan and allow these vibrant flavors to infuse into the warm cream for at least 30 minutes, or even longer for a more pronounced taste. This steeping process is vital for extracting the essential oils and aromatics. After infusing, strain the cream mixture through a fine-mesh sieve into a clean bowl, pressing gently on the solids to extract all flavor. Discard the leftover zest and ginger solids.
Step 2: Prepare the Egg Yolks and Combine
While the cream is infusing, separate your eggs, placing the yolks in a medium-sized bowl. Whisk the egg yolks vigorously until they are smooth and slightly lightened in color. This aeration helps create a lighter custard. Once the flavored cream has been strained and is still warm (but not scalding hot, as this can scramble the eggs), slowly temper the egg yolks. Gradually pour a small amount of the warm cream into the whisked egg yolks while whisking constantly. This slowly raises the temperature of the yolks without cooking them. Once a cup or so of cream has been incorporated, pour the tempered yolk mixture back into the remaining warm cream, whisking gently until fully combined. For the smoothest custard, consider straining the entire mixture one last time to catch any stray bits of cooked egg or zest that might have been missed.

Step 3: The Water Bath and Baking
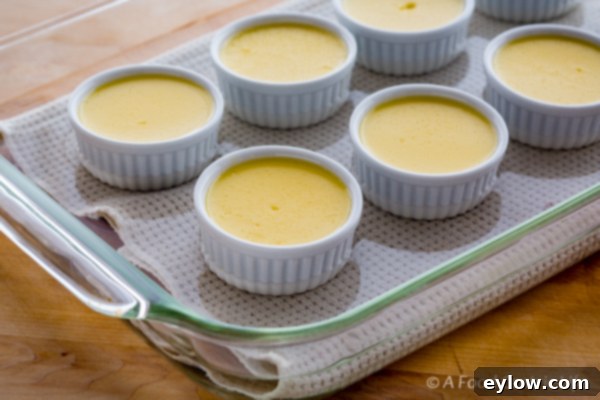
Preheat your oven to 300°F (149°C) with the oven rack positioned in the center. Start boiling water in a kettle. To prepare your baking dish, line a large, flat baking dish with a folded kitchen towel. This towel serves a dual purpose: it prevents your ramekins from sliding around and provides a gentle insulation layer for even baking. Carefully place your 2-ounce ramekins on top of the towel in a single, flat layer, ensuring they are not crowded. For easier filling, pour the liquid custard mixture into a 4-cup measuring cup with a pouring spout. Then, carefully fill each ramekin with the custard. Once filled, transfer the baking dish with the ramekins to the oven rack. With extreme caution, pour boiling hot water into the baking dish, ensuring the water level comes halfway up the sides of the ramekins. This crucial step is known as a water bath (or bain-marie), and it guarantees gentle, even baking, preventing the custards from curdling and resulting in an exceptionally smooth, luscious texture.

Step 4: Baking and Chilling
Bake the custards in the preheated oven for approximately 35 minutes. The baking time can vary slightly depending on your oven and the exact size of your ramekins. The custards are ready when the edges are set, but the centers still have a slight, delicate jiggle. The most accurate way to test for doneness is with a digital thermometer: insert it into the center of a custard, and it should register 170°F (76°C). Don’t worry about the small hole the thermometer leaves; it will be perfectly hidden by the caramelized sugar topping. Carefully remove the baking dish from the oven, then transfer the ramekins to a wire rack to cool completely at room temperature. Once cooled, cover each ramekin tightly with plastic wrap and refrigerate for at least 4 hours, or ideally overnight, to allow them to thoroughly chill and firm up. This chilling period is essential for achieving the perfect crème brûlée consistency.

Step 5: The Caramelized Sugar Top – The “Brûlée”
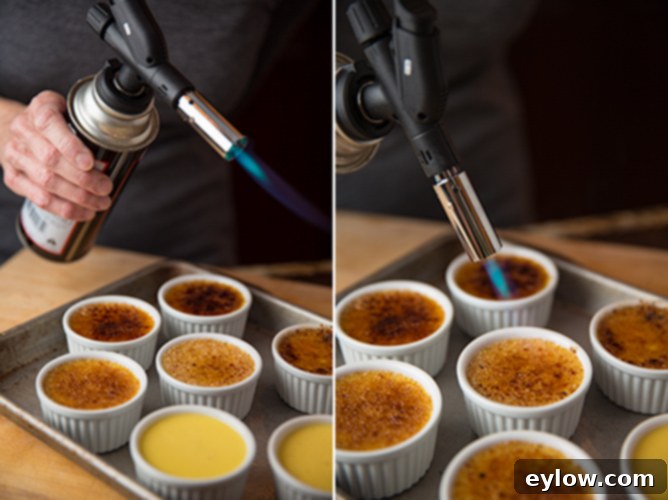
This is the magical part where the “crème brûlée” truly comes to life! To achieve that signature burnt sugar top, the best and most efficient tool is a kitchen blow torch. A torch melts the sugar quickly and evenly without warming the chilled custard underneath, preserving its perfect texture. I highly recommend a torch that securely locks onto a butane can for consistent, powerful flame. Avoid smaller, underpowered torches often sold in cooking stores, as they can take too long and heat the custard.
Choosing the Best Sugar for Crème Brûlée
For the ideal “brulee” effect, you need a coarse, golden-brown sugar. Look specifically for Demerara or Turbinado sugar. Their larger crystals and slight molasses content create a robust, flavorful, and wonderfully crunchy caramel crust. Fine granulated sugar tends to melt too quickly and can result in a thinner, less satisfying crust.
The Torching Process:
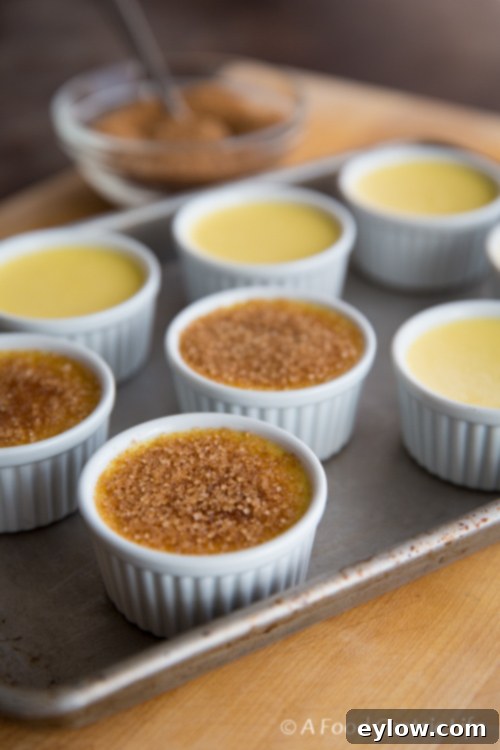
Remove the chilled ramekins from the refrigerator. Gently blot any condensation that may have formed on the surface of the custards with the edge of a paper towel. This ensures the sugar adheres properly and caramelizes evenly. Sprinkle about 2 teaspoons of the coarse Demerara or Turbinado sugar over the top of each custard. Gently tap and tilt the ramekin to distribute the sugar in an even, thin layer across the entire surface. Pour off any excess sugar to prevent an overly thick or burnt crust.
Light your kitchen torch. Start with a moderate flame setting. Hold the torch a few inches above the sugar, slowly moving the flame in a circular motion. You’ll see the sugar begin to melt, bubble, and transform into a beautiful golden-brown caramel. If you notice any area browning too quickly, pull the flame back slightly or move to another spot. The goal is an even, amber-colored crust, not a dark, burnt one. Continue until all the sugar has caramelized. Serve immediately to enjoy the delightful contrast between the warm, crisp topping and the cold, creamy custard!
For those who love the classics, try our traditional vanilla bean crème brûlée recipe. And if you’re a fan of citrusy ginger flavors, don’t miss our one-pan orange almond cake – it’s a truly easy and delicious baking project.

Tips for Perfect Orange Crème Brûlée Every Time
- **Don’t Rush the Infusion:** Allowing the orange zest and ginger to steep in the warm cream for at least 30 minutes is critical for deep flavor. The longer it infuses, the more pronounced the citrus and spice notes will be.
- **Temper Those Yolks:** Pouring hot cream directly into cold egg yolks will scramble them. Always temper the yolks by slowly adding a small amount of warm cream first, whisking constantly, before combining everything.
- **Strain for Silkiness:** Straining the cream after infusion and the final custard mixture before baking ensures the smoothest possible texture, free from any zest bits or accidental cooked egg.
- **The Importance of the Water Bath:** A water bath is non-negotiable for crème brûlée. It provides even, gentle heat, preventing the edges from cooking too fast and the center from becoming rubbery. It’s the secret to that perfectly wobbly, tender custard.
- **Don’t Overbake:** Overbaked crème brûlée will be firm and rubbery, losing its luscious appeal. The custard should still have a slight jiggle in the center when removed from the oven, as it will continue to set as it cools.
- **Chill Thoroughly:** Proper chilling, ideally overnight, is crucial. It allows the custard to fully set and firm up, ready to withstand the heat of the torch without melting.
- **Dry the Surface:** Before adding sugar and torching, gently blot any condensation from the custard surface with a paper towel. Moisture can prevent the sugar from caramelizing properly.
- **Even Sugar Layer:** A thin, even layer of coarse sugar is key for the brûlée. Too much sugar will create a thick, hard crust; too little might burn unevenly.
- **Master the Torch:** Keep the torch moving constantly over the sugar. Don’t hold it in one spot for too long, or the sugar will burn instead of caramelize. Aim for a beautiful, even amber color.
Make Ahead and Storage
One of the best features of crème brûlée is its make-ahead potential, which is perfect for entertaining. You can prepare and bake the custards up to 3 days in advance. Simply cool them completely, cover them tightly with plastic wrap, and store them in the refrigerator. When you’re ready to serve, remove them from the fridge, blot any condensation, add the sugar, and torch them just before presenting them to your guests. This allows you to prepare the majority of the dessert well ahead of time, minimizing stress on the day of your event and ensuring the freshest possible caramelized top.
Serving Suggestions
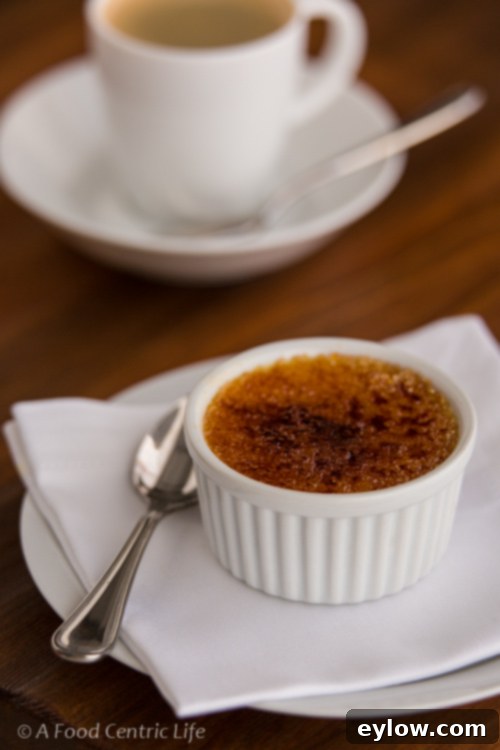
Orange ginger crème brûlée is a showstopper on its own, but a few garnishes can elevate its presentation even further. Consider a thin slice of candied orange peel, a small sprig of fresh mint, or a delicate orange segment. A light dusting of powdered sugar (after torching, if desired) can also add a touch of elegance. Pair this dessert with a strong espresso or a sweet dessert wine for a truly indulgent experience.
📖 Recipe

Orange Creme Brulee
Sally Cameron
Pin Recipe
Equipment
-
2 ounce ramekins
-
kitchen blow torch
Ingredients
- 2 cups heavy cream
- ⅓ cup organic sugar
- 1 pinch salt
- 1 ½ tablespoons fresh grated orange zest
- 1 tablespoon organic ginger puree or fresh finely grated ginger
- 6 large egg yolks
- 4 tablespoons demerara or turbinado sugar
Instructions
-
Pre-heat the oven to 300 degrees F (149 C) with the rack in the center. Put a full kettle on to boil water for a water bath.
-
In a medium pan, combine the heavy cream, granulated sugar, and salt. Heat over medium-low, whisking to dissolve the sugar completely. Bring to just under a simmer (small bubbles around the edge) and then immediately remove from heat. Stir in the grated orange zest and ginger. Cover the pan and allow the flavors to infuse for a minimum of 30 minutes.
-
In a medium bowl, whisk the egg yolks until smooth and slightly lightened. Strain the warm, flavored cream through a fine sieve directly into the bowl with the whisked yolks, stirring continuously to combine. Discard any leftover solids from the sieve. For easier pouring into ramekins, transfer the liquid custard into a 4-cup measuring cup with a pouring spout.
-
Line a large, shallow baking dish with a folded kitchen towel. Arrange the ramekins flat on the towel, ensuring they are not crowded. Fill the ramekins with the cream mixture. Carefully place the baking dish with the filled ramekins onto the center oven rack. Slowly and gently pour enough boiling hot water around the ramekins to come halfway up their sides. Carefully slide the oven rack back into the oven.
-
Bake the custards for approximately 35 minutes, or until the edges are set and the centers still have a slight jiggle. A digital thermometer inserted into the center should register 170 degrees F (76 C).
-
Carefully remove the ramekins from the water bath and transfer them to a wire rack to cool completely at room temperature. Once cool, cover each custard tightly with plastic film and refrigerate overnight, or for at least 4 hours, to ensure they are thoroughly chilled and set.
-
To finish and serve, remove the chilled custards from the refrigerator and uncover. Gently blot any pooled moisture on top with a paper towel. Sprinkle about 2 teaspoons of coarse Demerara or Turbinado sugar evenly over each custard, tapping the ramekin to ensure a thin, consistent coating. Light your kitchen torch and slowly move the flame over the sugar to caramelize it into a beautiful golden, brittle crust. Serve immediately to enjoy the delightful contrast!
