Mastering Pan-Seared Duck Breast: A Step-by-Step Guide to Restaurant-Quality Crispy Skin and Juicy Meat
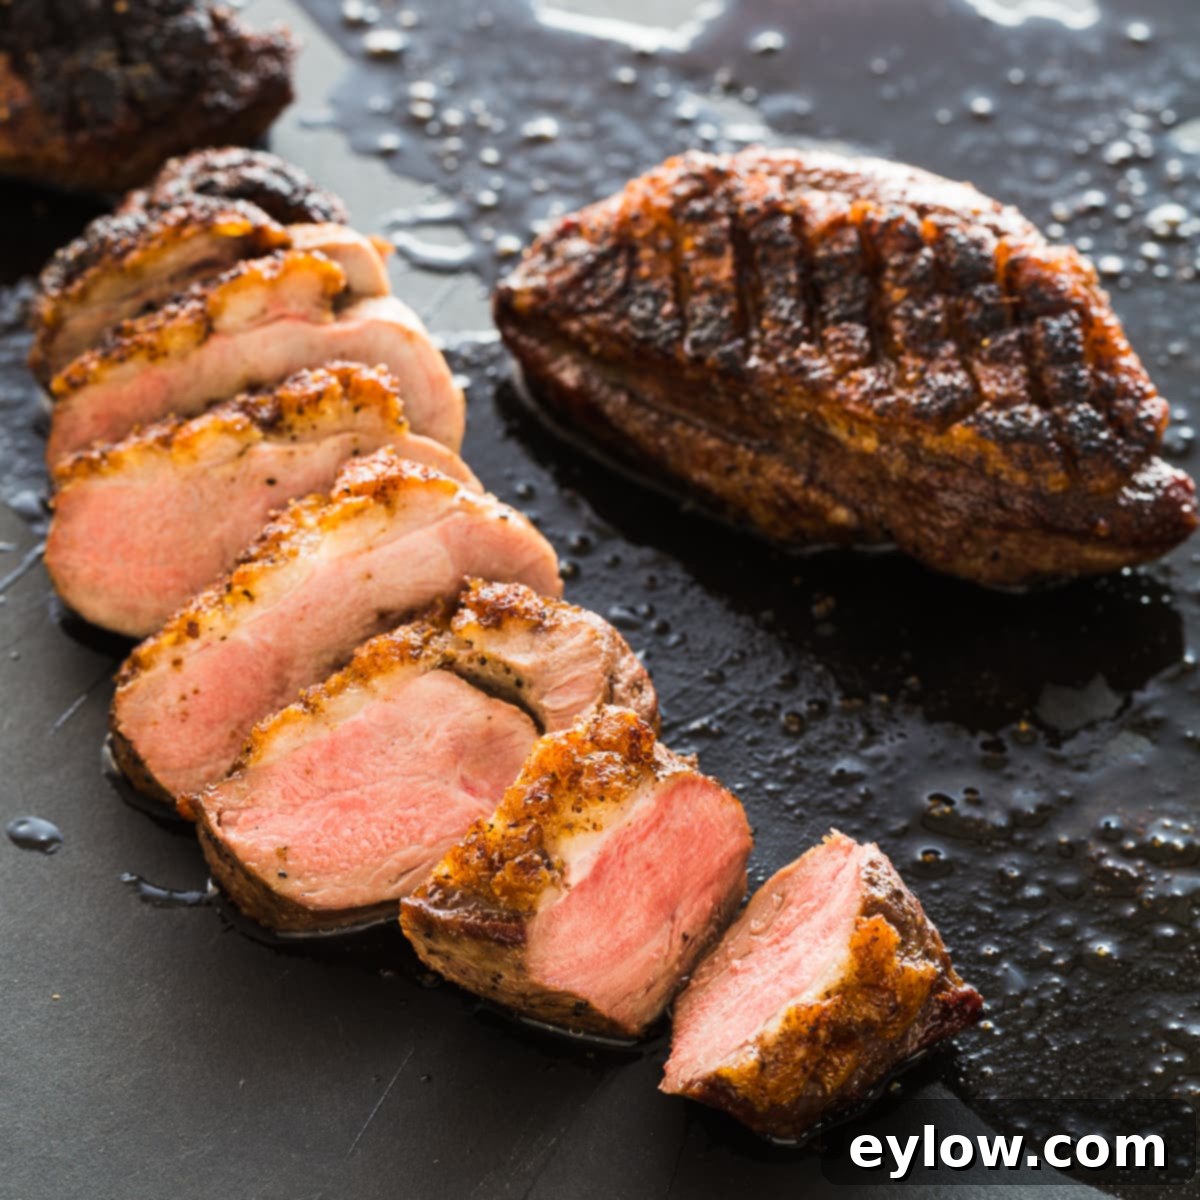
Are you searching for an extraordinary dinner experience that’s surprisingly easy to create in your own kitchen? Look no further than pan-seared duck breast – a truly restaurant-quality dish that comes together quickly, delivering impressive results with minimal effort. If you’ve never ventured into cooking duck breast before, you’re in for a delightful culinary treat! Duck breast boasts a rich yet wonderfully mild flavor, characterized by its irresistibly crispy, golden-brown skin and a tender, succulent, juicy interior. Once you experience the exquisite taste and texture of perfectly seared duck, you might just discover your new favorite protein to cook at home.
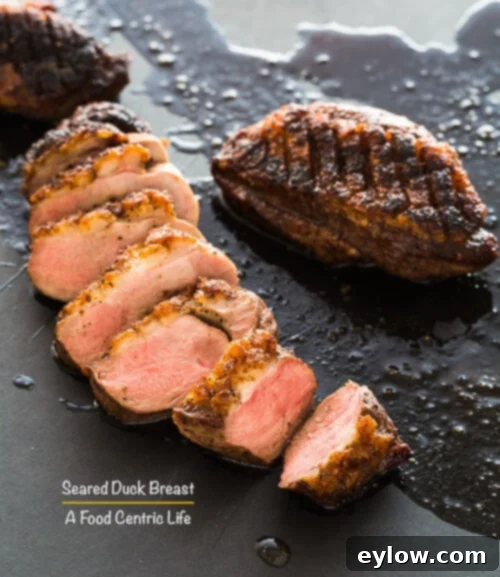
While duck breast might sound like a sophisticated dish reserved for fine dining establishments, it is remarkably straightforward to prepare at home. The secret to its success lies in one crucial technique: slowly rendering the fat from the skin. This meticulous process ensures that the duck skin transforms into a beautifully crispy, flavorful layer, while the meat beneath remains incredibly tender and juicy. Unlike chicken or other poultry, duck breast is traditionally best served medium-rare to medium. This optimal doneness level preserves its moist texture and enhances its distinctive, rich flavor. With just a few simple steps and a bit of attention to detail, you can effortlessly craft a dish that feels undeniably gourmet, yet is practical and quick enough for a satisfying weeknight dinner or an elegant weekend meal.
Preparing pan-seared duck breast is not just about cooking; it’s about mastering a technique that elevates a simple ingredient into a culinary masterpiece. The transformation of a raw duck breast into a golden, succulent piece of meat with a shatteringly crisp skin is incredibly rewarding. This guide will walk you through every step, ensuring your duck breast turns out perfect every time, from selecting the right cut to serving it with complementary sides and sauces.
Why You’ll Adore This Pan-Seared Duck Breast Recipe
- Effortlessly Gourmet: This recipe delivers a luxurious, restaurant-quality meal with surprisingly little fuss, making it perfect for impressing guests or treating yourself to something special without extensive preparation.
- Rich and Distinctive Flavor: Duck breast offers a unique, savory flavor profile that is richer than chicken but milder than many game meats. It’s an excellent way to introduce new tastes into your culinary repertoire.
- Perfectly Crispy Skin: The key to exceptional duck breast is its crackling, golden-brown skin. Our method ensures maximum fat rendering, resulting in a texture that’s utterly irresistible.
- Tender, Juicy Meat: Cooked to a perfect medium-rare, the duck meat remains incredibly tender and juicy, offering a delightful contrast to the crispy skin.
- Versatile for Any Occasion: Whether you’re planning a romantic dinner, a celebratory feast, or simply a gourmet weeknight meal, pan-seared duck breast fits the bill. It’s impressive enough for special events but accessible for everyday cooking.
- Healthy Protein Option: Duck breast is a lean protein source, especially once much of the fat has been rendered away. It’s packed with flavor and nutrients, making it a delicious and mindful choice.
- Quick Cooking Time: From preparation to plate, this recipe is surprisingly fast. The actual cooking time on the stovetop and in the oven is very short, ideal for busy schedules.
Essential Ingredients for Pan-Seared Duck Breast
Crafting the perfect pan-seared duck breast requires only a handful of quality ingredients. Focusing on the duck itself and simple seasonings allows its natural, rich flavor to truly shine.
- Duck Breast: Opt for boneless, skin-on duck breasts. The skin is crucial for achieving that signature crispy texture.
- Seasoning: High-quality sea salt and freshly ground black pepper are fundamental. They enhance the duck’s natural flavor without overpowering it.
Chef’s Note on Buying Duck Breast: When selecting duck breast, the most widely available and popular breed in the U.S. is White Pekin. This is often my preferred choice due to its consistently mild flavor and generous fat cap, which renders beautifully. Other breeds, such as Muscovy, Moulard, or Mallard, can offer a more robust or “gamey” taste, which some connoisseurs prefer. Feel free to choose the breed that best suits your palate. You’ll typically find boneless duck breasts packaged in bundles, often containing 2-4 pieces, weighing around 1 pound in total. For this recipe, a package of approximately 1 pound was perfect for serving two people generously after trimming and cooking. Look for breasts with an intact, even layer of fat and vibrant, plump meat.
While salt and pepper are sufficient, you can experiment with other seasonings to complement the duck. A pinch of granulated garlic or a touch of Chinese Five Spice, as mentioned in the recipe summary, can add an aromatic depth that pairs wonderfully with duck.
Step-by-Step Instructions: Achieve Crispy Perfection
Cooking duck breast to perfection is a simple, methodical process. Follow these steps to ensure a crispy skin and a juicy, tender interior.
To begin, pre-heat your oven to 425°F (220°C). Concurrently, place a heavy-bottomed pan, ideally a cast-iron skillet, over medium-high heat on your stovetop. Allow the pan to heat thoroughly until it’s very hot but not yet smoking. While your pan heats, it’s time to prepare the duck breasts.
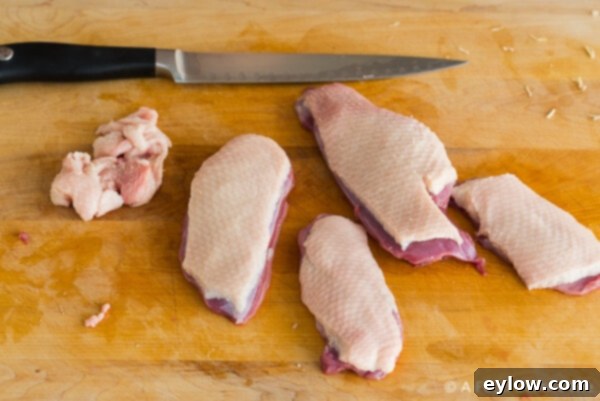
Lay the duck breasts skin-side down on a clean cutting board. Carefully inspect the edges and trim off any excess fat that extends beyond the flesh of the meat. This step is important because extra fat hanging over the sides can burn during searing and also prevents the breast from lying flat, which is crucial for even cooking. Once trimmed, when you flip the duck breasts over, they should appear neat and uniform, as shown in the photo above.
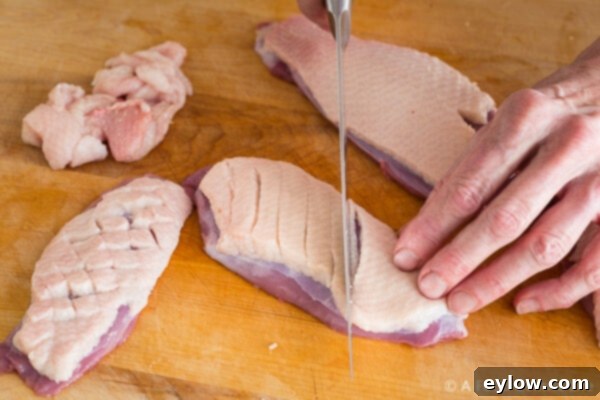
Next, flip the duck breasts so the fat side is facing up. Using a thin, very sharp knife, score the duck fat into a cross-hatch pattern. Make parallel slices about ½ inch apart in one direction, then repeat in the opposite direction to create a diamond pattern. The key here is to slice through the fat layer completely, but be very careful not to cut into the underlying flesh. A sharp knife is your best friend for this task; let the knife do the work, drawing it gently across the fat with minimal pressure. This scoring technique helps the fat render more efficiently and evenly, leading to a much crispier skin while preventing the skin from shrinking and causing the breast to curl during cooking.
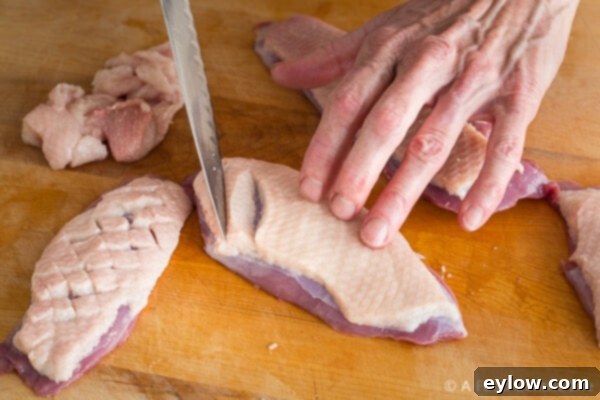
After you have expertly trimmed and scored the duck breasts, it’s time to season them. Liberally sprinkle the fat side of each duck breast with sea salt and freshly ground black pepper. You can also add a pinch of granulated garlic or your preferred additional seasonings at this stage, rubbing them gently into the scored fat. Make sure the seasoning is evenly distributed.
Now, reduce the heat under your hot skillet to medium. Carefully place the seasoned duck breasts, fat side down, into the pan. You should hear a gentle sizzle, indicating the pan is at the right temperature. The goal is to render the fat slowly, so avoid turning up the heat too high, which could burn the skin before the fat has fully melted. Let the duck sear, undisturbed, for several minutes. This slow rendering process is critical for achieving a perfectly crispy skin. Continue cooking until the fat layer is significantly reduced, and the skin turns a beautiful, dark golden brown. Keep a close eye on it to ensure it doesn’t burn. As the fat renders, it will turn liquid in the pan, creating a flavorful cooking medium.
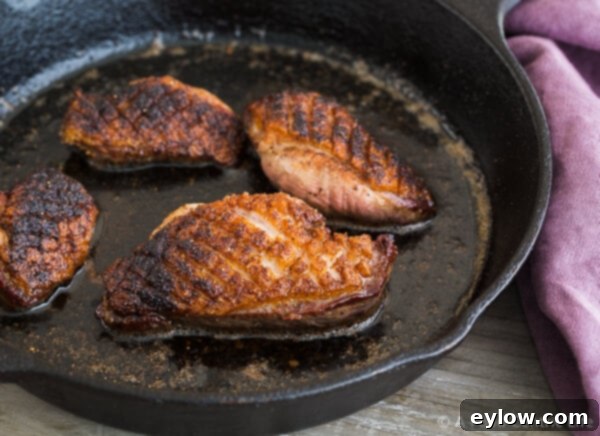
Once the skin side is gloriously golden and crisp, flip the breasts over to the flesh side. Immediately transfer the pan into your pre-heated 425°F (220°C) oven. Allow them to cook for just 2-3 minutes to finish. This brief stint in the oven brings the meat to the desired medium-rare to medium doneness without overcooking the delicate flesh. For perfect medium-rare (130-135°F / 54-57°C), use a meat thermometer inserted into the thickest part of the breast. For medium (135-140°F / 57-60°C), cook slightly longer.
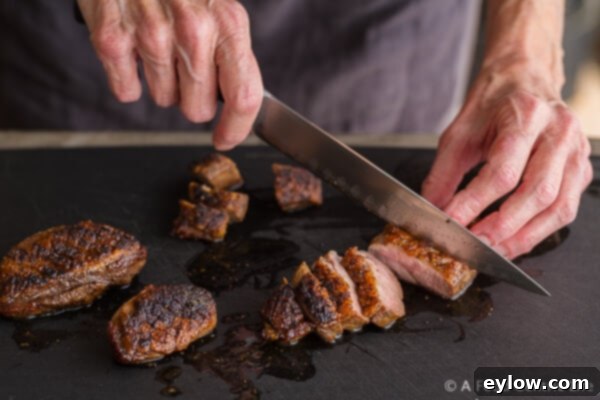
Carefully remove the pan from the oven. Using tongs, lift the cooked duck breasts out of the rendered fat and place them on a clean cutting board. It is crucial to allow the duck breasts to rest for at least 5-10 minutes. This resting period allows the juices to redistribute throughout the meat, ensuring every slice is incredibly tender and moist. Skipping this step can result in dry meat. After resting, slice the breasts across the grain into ½-inch thick pieces. The rendered duck fat is a culinary treasure; strain it through a fine-mesh sieve into an airtight container and refrigerate. It’s excellent for roasting potatoes, vegetables, or even making confit.
Chef’s Tip for Sauce Making: If you plan to incorporate wine into a sauce, there’s no need to open a full bottle just for a splash. Consider purchasing mini, airline-sized bottles of wine. They are incredibly convenient for cooking, ensuring you always have just the right amount without waste.
Elevate Your Meal: Serving Suggestions for Duck Breast
Pan-seared duck breast is a versatile main course that pairs beautifully with a variety of flavors and textures. Whether served simply on its own or with a complementary sauce and sides, it always makes for an elegant presentation.
I highly recommend serving crispy seared duck breast with an easy homemade fruit sauce. My go-to is a simple blackberry sauce, which can be made with either fresh or frozen blackberries. To prepare, gently crush the berries and simmer them in a small saucepan with a splash of red wine (or water for an alcohol-free version) and a spoonful of low-sugar jam or honey to sweeten and thicken slightly. A dash of vinegar – either a good quality regular balsamic, or a fruit-infused balsamic like blackberry or blueberry balsamic – will add a bright, acidic lift that beautifully cuts through the richness of the duck and enhances the fruit flavor.
Beyond fruit sauces, duck breast is also fantastic with a classic orange sauce (using fresh orange juice, zest, and a touch of Grand Marnier) or a simple pan sauce made by deglazing the pan with a bit of stock or wine after the duck is removed. For a more savory approach, a rich cherry sauce or a red wine reduction also works wonders.
For side dishes, keep it relatively simple to let the duck remain the star. Fresh green vegetables like tender broccolini or crisp asparagus, lightly steamed or roasted, are excellent choices. A creamy, comforting starch such as riced mashed potatoes, a wild rice pilaf, or a soft polenta would be perfect. Roasted root vegetables like carrots, parsnips, or sweet potatoes also offer a delightful sweetness and earthiness that complements duck. To add balance and freshness to your plate, a vibrant tossed green salad is always a good idea. If you’re looking for inspiration to keep your salads interesting and exciting, be sure to read our article on building better salads for creative tips and combinations.
For wine pairings, consider a Pinot Noir, which offers fruity notes and a lighter body that won’t overpower the duck. A Zinfandel or a dry Riesling can also be excellent choices, depending on your sauce. The key is to find a wine that complements, rather than competes with, the rich flavors of the duck.
Tips for Achieving Perfect Pan-Seared Duck Breast Every Time
- Start Cold, Finish Hot: Place duck breasts fat-side down in a cold or moderately warm pan, then gradually increase heat. This allows the fat to render slowly and thoroughly. Finishing in a hot oven ensures even cooking of the meat without over-searing the skin.
- Don’t Rush the Render: Rendering the fat is the most time-consuming part, but it’s essential for crispy skin. Be patient and keep the heat at medium.
- Rest Your Meat: Always allow the duck breasts to rest for 5-10 minutes after cooking. This crucial step lets the juices redistribute, resulting in more tender and flavorful meat.
- Use a Meat Thermometer: For precise doneness, especially if you’re new to cooking duck, a good meat thermometer is invaluable. Aim for 130-135°F (54-57°C) for medium-rare, or 135-140°F (57-60°C) for medium.
- Save the Duck Fat: Rendered duck fat is liquid gold! Strain it and store it in the refrigerator. It’s fantastic for roasting potatoes, vegetables, or even making savory pastries.
Storage and Reheating Pan-Seared Duck Breast
If you happen to have any leftover pan-seared duck breast, it stores quite well and can be enjoyed later, though the skin may lose some of its crispiness. Store cooked and cooled duck breast in an airtight container in the refrigerator for up to 3-4 days. To reheat, it’s best to avoid the microwave as it can make the meat tough and rubbery. Instead, gently warm the slices in a skillet over low heat until just warmed through, or in a preheated oven at 300°F (150°C) for about 10-15 minutes. For maximum crispiness, you can place the duck slices skin-side up on a baking sheet and broil for a minute or two, watching carefully to prevent burning.
Frequently Asked Questions About Cooking Duck Breast
- How do I ensure the duck skin gets crispy?
- The key is slow rendering. Start with the duck skin-side down in a cold or moderately warm pan, then gradually increase the heat to medium. This allows the fat to slowly melt out, leaving behind a crisp skin. Scoring the skin also helps.
- What temperature should duck breast be cooked to?
- Duck breast is best served medium-rare (130-135°F / 54-57°C) or medium (135-140°F / 57-60°C) for optimal tenderness and flavor. Unlike chicken, which needs to be cooked to a higher temperature, duck is safe and delicious at these lower temperatures. Always use a meat thermometer for accuracy.
- Can I skip the oven step?
- While it’s possible to cook duck breast entirely on the stovetop, finishing it in the oven ensures more even cooking of the meat, especially in thicker breasts, without over-browning the skin. If you skip the oven, you’ll need to cook the flesh side longer on the stovetop over low heat.
- What if my duck breast curls up while cooking?
- This is usually due to inadequate scoring of the fat. Ensure you cut through the fat layer completely when scoring, without cutting into the meat. If it still curls, you can gently press it down with a spatula or use a heavy pan on top for the initial searing phase.
- Is duck fat healthy?
- Duck fat is primarily monounsaturated fat, similar to olive oil, which is considered a healthier type of fat. While it’s still fat and should be consumed in moderation, it’s a flavorful and useful cooking medium that can be a part of a balanced diet.
📖 Recipe

Pan Seared Duck Breast
Sally Cameron
Pin Recipe
Equipment
-
Cast iron skillet or other heavy pan
Ingredients
- 2 pounds boneless duck breast I like Pekin, ask your butcher
- ¼ teaspoon Sea Salt and optional granulated garlic
- ¼ teaspoon ground black pepper
Instructions
Ready the oven and pan
-
Pre-heat your oven to 425°F (220°C). Place a cast iron skillet or other heavy fry pan (a 10″ pan works well for two duck breasts) on the stovetop and heat it over medium-high heat until very hot, but not smoking.
Trim and Score Duck Breast
-
Open the package of duck breasts and carefully drain off any liquid. Place the breasts skin side down on a cutting board and trim any excess fat that extends beyond the edges of the meat. This prevents burning and ensures even cooking.
Turn the breasts over, fat side up. With a thin, sharp knife, score the duck skin into a cross-hatch or diamond pattern, making slices about every ½ inch. Ensure you slice completely through the skin and fat, but take care not to cut into the meat itself. Refer to the photos in the main post for visual guidance. Season generously with sea salt and ground black pepper (and optional granulated garlic).
Sear and Finish Duck Breasts
-
Once the pan is thoroughly hot, reduce the heat to medium. Carefully place the seasoned duck breasts fat side down in the pan. The pan should sizzle immediately upon contact, confirming it’s at the correct temperature for rendering.
-
Allow the duck skin to sear slowly until it becomes perfectly crisp and a deep, dark golden brown. Monitor closely to prevent burning. Once the desired color and crispiness are achieved (this can take 8-12 minutes depending on thickness and heat), turn the breasts over to the flesh side. Immediately transfer the entire pan into the preheated oven for 2-3 minutes to finish cooking the meat to a medium-rare to medium doneness.
Remove the pan from the oven and carefully transfer the duck breasts to a cutting board. Allow them to rest for at least 5-10 minutes. This resting period is crucial for the juices to redistribute, ensuring the meat remains tender and succulent. After resting, slice the breasts across the grain into desired portions. Serve alone or with your choice of delicious sauce and sides.
